
Anatomy of a DOOM Level: Part 1 - WAD File Structure
Lets take a deep dive into the structure, anatomy and loading of a DOOM WAD file and its lump data.
DOOM levels are commonly known as WAD files. In fact a single WAD file contains all of the levels and data for an entire classic DOOM or DOOM II campaign, linked together in the form of episodes. The DOOM engine and the WAD file format was licensed by other studios like Ravensoft for games like Hexen and Strife.
Make a Doom Engine in Python Update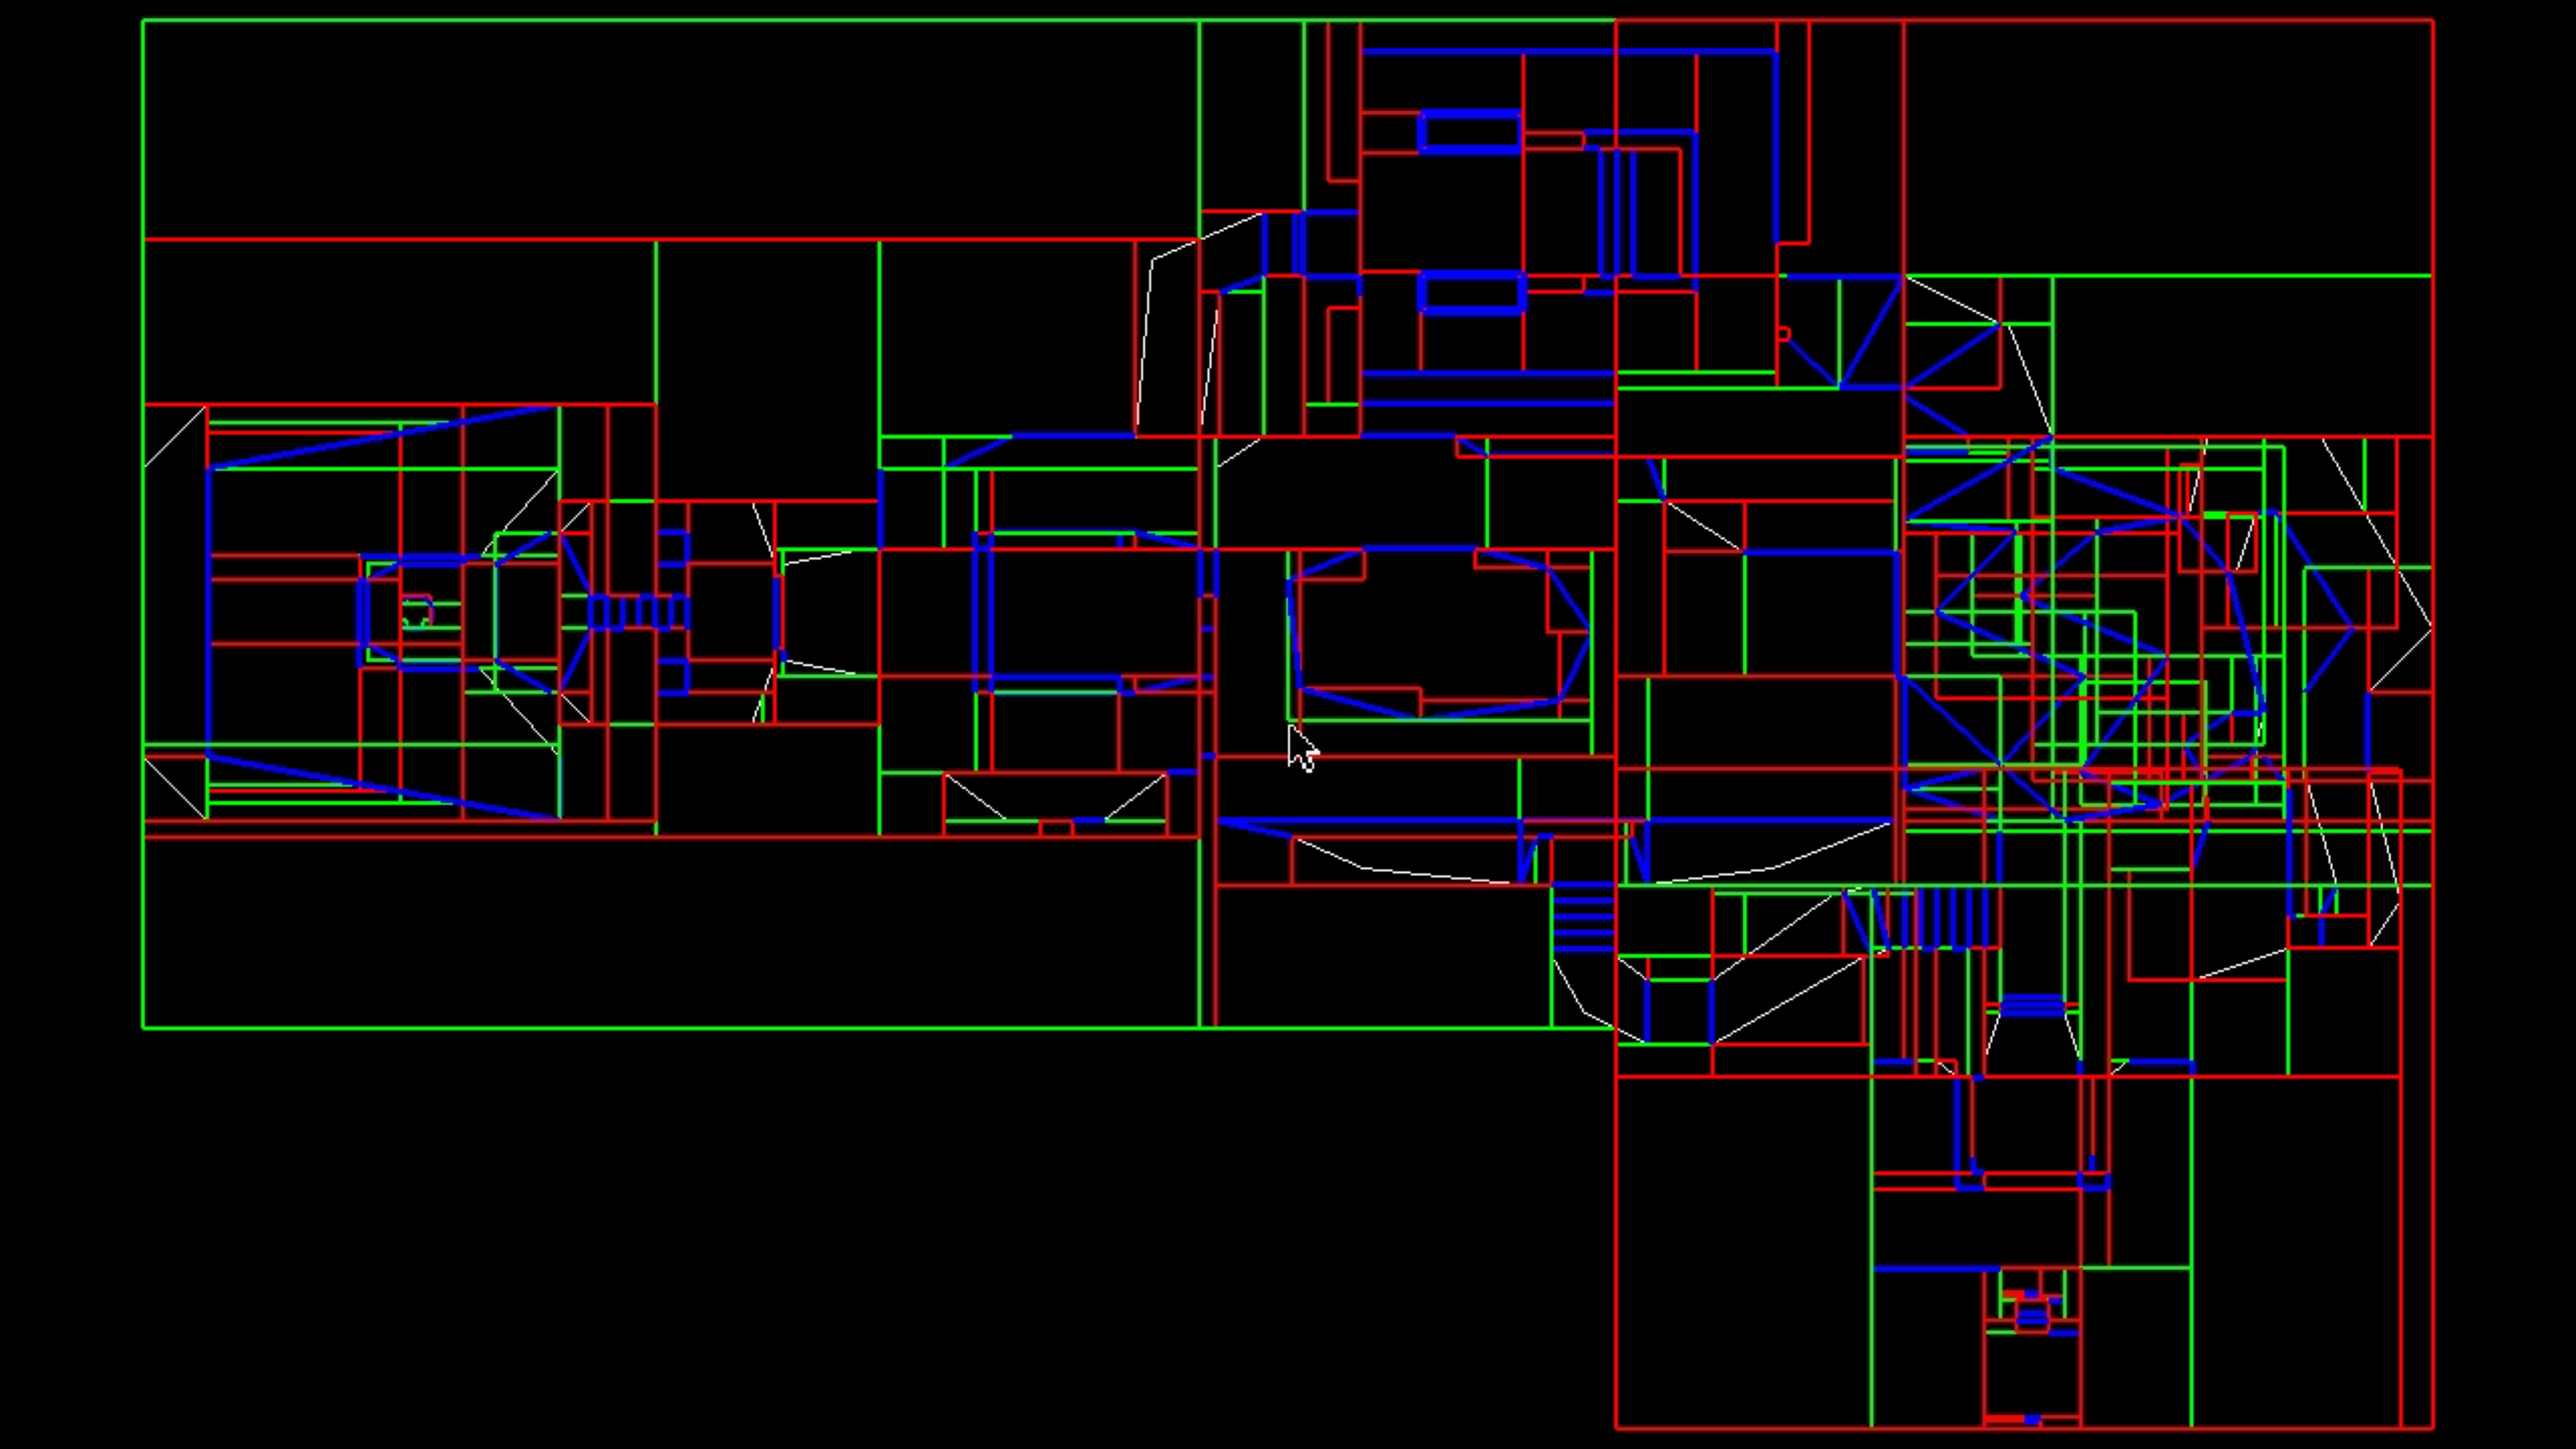
WAD stands for "where's the data?", as it was coined by the DOOM creators back in the early 90s. But I won't be spending too much doing a history on DOOM so much, as that exists in better substance elsewhere. This is a focus on DOOM level building and two major parts:
- The format and structure of a WAD file
- Creating a DOOM level using a modern creation tool
Helpful References
The best efforts I have found understanding the format of a WAD file are not so much the WIKI and documentation found online, but instead some of the original documentation from that era and the source code of the DOOM engine itself.
I found the efforts of this project DIY Doom and it's reverse engineering of the DOOM engine to shed light on the WAD structure. For a deep dive I suggest you go there. It was the basis for my own recreation of the DOOM engine in Python as a pet project. I will reference this as "DIY".
Additionally The Unofficial DOOM Specs file authored by Matthew S. Fell in 1994 provides the most comprehensive detail I can find, written in a classic text document, regarding the structure of a WAD file. I will reference this as "UDS".
Types of WAD Files
There are two main types of WAD files: an IWAD and a PWAD. IWAD stands for "internal WAD" and contains all of the main game data. A PWAD stands for "patch WAD" and can contain data that overwrites the IWAD content, much like a mod or patch. Somewhat confusingly both WAD files are traditionally ended in the .WAD extension, such as DOOM.WAD as an IWAD and HEXADEATHIMAL.WAD as a PWAD.
For the second part of this page we will be creating a PWAD level which will be overwriting the MAP01 level of the main IWAD file of DOOM II.
WAD Structure
A WAD file is divided up into "lumps", each containing contiguous information about the game or level part. The primary IWAD has the following lumps:
LumpName    Description
--------    -----------
PLAYPAL     fourteen 256 color palettes
COLORMAP    maps colors in the palette down to darker ones
ENDOOM      text message displayed when you exit to DOS
DEMOx       x=1-3, are the demos
ExMy        subsequent entries define a single level's data
MAPxy       like ExMy, but for DOOM 2
TEXTURE1    list of wall texture names and their composition data,
            used in the SIDEDEF portion of each level
TEXTURE2    more wall texture compositions
PNAMES      lists all lump names used as wall patches
GENMIDI     General Midi standard instrument data
DMXGUS      Gravis Ultra Sound instrument patches

D_ExMy      music for a doom 1 level
D_INTER     music played on the summary screen between levels
D_INTRO     music played when the game starts
D_INTROA    more introductory music
D_VICTOR    music played on the victory text-screen after an episode
D_BUNNY     music for while a certain rabbit has his story told
D_*         music for a doom 2 level
...
following   lumps contain menu data, strings and pictures
excerpt from UDS
Our custom level we will be building mostly concerns itself with the ExMy and MAPxy sections since we will be creating a level that overwrites MAP01 of DOOM II and not overwriting other portions of the game such as music, sprites or menus.
Each level consists of the map directory entry (such as E1M1) and 10 lumps itself:
LumpName    Description
--------    -----------
THINGS      monsters, weapons, keys, etc
LINEDEFS    line data from on vertex to another
SIDEDEFS    defines what to draw on the side of a line
VERTEXES    start and end points for lines and segs
SEGS        subdivided lines created by the Binary Space Partitioner
SSECTORS    subdivided convex SECTOR polygons created by the BSP
NODES       branches of the BSP tree
SECTORS     partitioned areas of the map, such as rooms, stairs etc
REJECT      ai rules for monsters in sectors
BLOCKMAP    map subdivision lists of lines for collision detection
A level PWAD can contain any amount of data to overwrite in the original IWAD, it does not have to be complete. We could write a PWAD for E1M1 on DOOM with just new THINGS data.
Data Layout
# BIG-ENDIAN format
                       <---- 32 bits  ---->
                       /------------------\
            --->  0x00 |  ASCII WAD Type  | 0X03
            |          |------------------|
    Header -|     0x04 | # of directories | 0x07
            |          |------------------|
            --->  0x08 | directory offset | 0x0B --
            --->       |------------------| <--    |
            |     0x0C |     Lump Data    |    |   |
            |          |------------------|    |   |
    Lumps - |          |        .         |    |   |
            |          |        .         |    |   |
            |          |        .         |    |   |
            --->       |        .         |    |   |
            --->       |------------------| <--|---
            |          |    Lump offset   |    |
            |          |------------------|    |
 Directory -|          | directory offset | ---
    List    |          |------------------|
            |          |    Lump Name     |
            |          |------------------|
            |          |        .         |
            |          |        .         |
            |          |        .         |
            --->       \------------------/
except from DIY
The above diagram shows the general layout of a WAD file with its byte offsets and contents.
The Header section contains data:
- WAD Type indicates if it is an IWAD or PWAD
- Number of directories is an integer representing the number directories contained in the WAD
- Then lumps, broken up based on their directory positioning
The Directory allows us to navigate within the WAD file to any directory we care to load. These are lumps such as THINGS, VERTEXES etc. Each directory entry in the header defines:
- the Lump Name
- the Lump Byte Position within the WAD
- the Lump Byte Size to load
Considering that a Map is just a sub section of a WAD file it makes more sense to define an Object representing a DOOM Map and its structures through a class. This class will have all of the corresponding lumps within it defined, along with metrics around their binary sizes, positions and data types. It also can contain the logic for linking data together such as vertices to their parent linedefs and functionality for traversing the BSP Tree.
The BSP Tree
The BSP Tree that is generated from the Binary Space Partition algorithm is done prior to the WADs creation and the data is stored in the WAD file as a set of tree Nodes. This data structure is very important for the rendering of DOOM walls in the game and calculating wall positions in relation to the player position. I will not be doing a deep dive on the BSP tree but it can be found in the algorithm section on Binary Space Partitioning.
The MAP Class
The Map class contains all of the data of a Map lump that is loaded. It defines the static layout of the lumps within it and has lists of all data that will be loaded. Additional functions around linking data and navigating the BSP tree will be appended later.
class Map(object):
    # used to identify if a node id has the sector bit on the end
    # 0x8000 in binary 1000000000000000
    # 0x8000 in decimal 32768
    SUBSECTORIDENTIFIER = 0x8000
    class Indices:
        NAME      = 0
        THINGS    = 1
        LINEDEFS  = 2
        SIDEDEFS  = 3
        VERTEXES  = 4
        SEGS      = 5
        SSECTORS  = 6
        NODES     = 7
        SECTORS   = 8
        REJECT    = 9
        BLOCKMAP  = 10
        COUNT     = 11 # enum helper for looping
    def __init__(self):
        # WAD Data
        self.name = ""
        self.vertices = []
        self.linedefs = []
        self.things = []
        self.nodes = []
        self.subsectors = []
        self.segs = []
        self.sectors = []
        self.sidedefs = []
As you can see the Indices are listed in the same order as the lumps defined in our UDS guide.
The WAD Class
If a Map is a class that represents a WAD's map lump, we should also define a WAD class that has the capability of loading a WAD file and populating our Map object data. This Wad class:
class WAD(object):

    def __init__(self, wadpath):
        self.wadpath = wadpath;
        self.f = open(self.wadpath, 'rb') # read-binary

        self.loadHeader()
        self.loadDirs()

    def loadHeader(self):
        # The header has a total of 12 bytes (0x00 to 0x0b)
        # this 12-bytes is divided to 3 groups
        # first 4 bytes is the WAD type as CHAR
        # second 4 is count of directories as Int
        # third 4 is Int offset of directories
        self.type = self.load_string(0, 4) # char[]
        self.dircount = self.load_uint32(4) # uint32
        self.diroffset = self.load_uint32(8) # unit32

    def loadDirs(self):
        self.dirs = []
        self.dirMap = {}
        for i in range(0, self.dircount):
            offset = self.diroffset + 16 * i
            # get dir info
            directory = Directory()
            directory.lumpOffset = self.load_uint32(offset)
            directory.lumpSize = self.load_uint32(offset + 4)
            directory.lumpName = self.load_string(offset + 8, 8)
            self.dirs.append(directory)
            # keep hashmap of directory name to its index
            self.dirMap[directory.lumpName] = len(self.dirs) - 1
The constructor loads the wad file from disk then loads the two main definitions from its start: the Header and the Directory listing.
Loading the header itself is relatively simple if we follow the conventions defined for sizes and it provides data about our directory portion of our header.
The Directory loading operation organizes a list of Directory objects containing the lump position, name and offset of all of the data of our WAD file. We then keep a handy hashmap of the lump name and its position in our directory list for lookup.
The Directory class
class Directory(object):
    def __init__(self):
        self.lumpOffset = 0 # uint32
        self.lumpSize = 0 # uint32
        self.lumpName = '' # char[8]
Continuing on with our WAD class we need to be able to load a map into our Map class and all of its subsquent parts. We can do so with these new Wad class methods:
    # ... continuation of Wad class
    def loadMap(self, mapName):
        map = Map()
        map.name = mapName
        if self.loadMapData(map):
            return map
        return None

    def loadMapData(self, map):
        mapIndex = self.findMapIndex(map)
        if mapIndex == -1:
            return False

        # load map data
        if self.readMapDataList(map, mapIndex + Map.Indices.THINGS, "THINGS", Thing.sizeof(), self.readThingData, map.things) is False:
            print("ERROR: Failed to load map things " + map.name)
            return False
        # ... skipped other map data ...

        # run some helpers to define the map
        map.createData()

        return True

    def findMapIndex(self, map):
        if map.name in self.dirMap:
            return self.dirMap[map.name] # get index
        return -1
The method loadMap will create our Map instance and call loadMapData. loadMapData then uses the Directory map to find the Directory instance based on the name of our Map lump such as "E1M1" or "MAPO3" etc.
Once we have found our directory we can then specifically load map data into the map object off its sub-lumps for THINGS, LINEDEFS etc. This data loading is facilitated by readMapDataList which is defined as:
    # ... continuation of Wad class
    # LIST LOADER
    # Takes a pointer to a list location in
    # the WAD and loads the data into the
    # relevant map list
    def readMapDataList(self, map, indexOffset, lumpName, byteSize, reader, mapList):
        directory = self.dirs[indexOffset]
        if directory.lumpName != lumpName:
            return False

        count = int(directory.lumpSize / byteSize)
        for i in range(0, count):
            item = reader(directory.lumpOffset + i * byteSize)
            mapList.append(item)
This method takes the Map's offset in the WAD plus the map's lump data offset to seek to the position of the WAD to load data from. It also takes a byteSize which is the size of each object in the lump, and a function pointer called reader which knows how to load the binary data into a Map object such as a thing. It also takes a list to append this data to.
We will be looking closer at this next with loading our THINGS object.
Loading THINGS
A THING is comprised of the following attributes:
- x position in map as an
int16 - y position in map as an
int16 - angle in map as an
int16 - type as an
int16 - flags as an
int16
These 5 attributes are each 16 bit integers and thus each THING is actually 10 bytes.
Recall that our Directory records include both the lump position and byte size, so we can calculate the number of THINGS within the lump with: directory thing lump byte size / thing byte size
class Thing(object):
    # Types https://doomwiki.org/wiki/Thing_types
    class Types:
        # Other
        O_PLAYER1 = 1
        # ...
        M_CACODEMON = 3005
        M_LOSTSOUL = 3006
        # ...
    def __init__(self):
        # WAD DATA
        self.x = 0 # int16
        self.y = 0 # int16
        self.angle = 0 # uint16
        self.type = 0 # uint16
        self.flags = 0 # uint16
    def sizeof():
        return 10
The important parts of this class are the properties and the byte sizeof. THINGS are special in that they also have flag and type data and I have deleted a substantially large list of type integers.
Our Wad class references this specifically when it loads the map data for THINGS with the following code
        # ... from Wad class loadMapData function
        if self.readMapDataList(map, mapIndex + Map.Indices.THINGS, "THINGS", Thing.sizeof(), self.readThingData, map.things) is False:
            print("ERROR: Failed to load map things " + map.name)
            return False
In here we are specifying bothe the map offset and THINGS offset within it, then the size of bytes for a single THING and a reader function for how to load this data from the WAD, and finally the map's things list to append into. Let's take a look at our reader function for THING data:
    # ... continuation of Wad class
    def readThingData(self, offset):
        t = Thing()
        t.x = self.load_sshort(offset)
        t.y = self.load_sshort(offset + 2)
        t.angle = self.load_ushort(offset + 4)
        t.type = self.load_ushort(offset + 6)
        t.flags = self.load_ushort(offset + 8)
        return t
In a relatively simple fashion we load the THING data into a Thing object based on the data layout of its properties. The load_* methods were actually a little tricky to define in Python and its been some time since I wrote them so I am a bit rusty on how they are working but they are as follows for reference:
    # ... continuation of Wad class
    # DATA TYPE LOADERS
    # Gets raw byte data from WAD
    # in expected format
    def load_string(self, offset, length, preserveNull = False):
        self.f.seek(offset)
        sss = ''
        for i in range(0, length):
            c = struct.unpack('<c', self.f.read(1))[0]
            if ord(c) != 0:
                sss += str(c, 'ascii')
        return sss

    def load_sshort(self, offset):
        self.f.seek(offset)
        f = self.f.read(2)
        return struct.unpack('<h', f)[0]

    def load_ushort(self, offset):
        self.f.seek(offset)
        f = self.f.read(2)
        return struct.unpack('<H', f)[0]

    def load_uint32(self, offset):
        self.f.seek(offset)
        f = self.f.read(4)
        return struct.unpack('<I', f)[0]
This makes use of the struct package in Python to load binary data from our file pointer. The storage format for a WAD file was big endian.
Combining all of these methods together we are able to:
- Take a WAD flat file and instantiate a
Wadclass - The
Wadclass loads the flat file and reads the header and directory data for its contents - We can specify a map name such as "E1M1" and build a
Mapinstance for the map - We can load the lump data for the map into lists as fitting
- When all elements are loaded we can use the
Mapclass for rendering and running our DOOM game
Loading LINEDEFS, SIDEDEFS, VERTEXES, SEGS, SSECTORS, NODES, SECTORS, REJECT, BLOCKMAP
Loading all of the remaining data is exactly the same. We define a class for each one with its properties and overall byte size and load each item into the map's corresponding list.
At this point we have successfully loaded a WAD Map into our program.
Rendering Overview
Rendering a DOOM level is an involved process that I will not go into detail about in this section. But I do feel it is important to go over some basics regarding how WAD data is used to render the DOOM world for the player.
First we must understand that the DOOM engine was quite novel in its design and allowed them to bend the DOS system limitations of old computers to render an actual 3D game. It has been argued that DOOM is not a 3D game but instead a 2D game because as we have seen the level structure of a DOOM game is indeed mostly defined as a 2D system of coordinates. This carries over into much of the game play in regards to positioning, shooting and collisions. However we cannot disclude the other 3D elements of the level data as well. Things such as floor height and ceiling height within a SECTOR clearly are used to represent 3D elements in the game world. You do navigate in a z coordinate in regards to your perceived height within the game map. Enemies, objects and terrain has a realistic 3D coordinate in regards to perception and the Camera code of the game also uses quite optimized 3D rendering perspectives to make the game come to life.
So we have an engine that is constrained by both 2D and 3D elements giving rise to the name 2.5 Engine. Personally, I feel like it truly is a 3D engine as that is how it is perceived and felt overall. The 2D constraints are just that, constraints on the 3D world regarding level editing and interaction. But if the mind perceives 3 dimention graphics then I believe it has succeeded at being a 3D engine. Becoming too literal about its definition is arbitrary because any game realized on a 2D monitor screen could be argued that it is 2D dimensional because of its constraints. Even VR could fall victim to this argument since it is more or less a 2D screens before your eyes tricking your mind into a more immersive 3D experience.
Regardless, lets understand some core elements of rendering a DOOM world from our WAD data.
- The Binary Space Partition tree is used to render walls from closest to furthest using NODE data from the Map Lump
- Things, SideDefs contain pointers to renderable sprites within our larger WAD file format
Parts of the WAD file are loaded into memory up front as a level is loaded while other parts are referenced dynamically within the game world interaction to determine rendering position of objects in relation to the player.
Take a look at the Binary Space Partitioning for details on how that portion works.
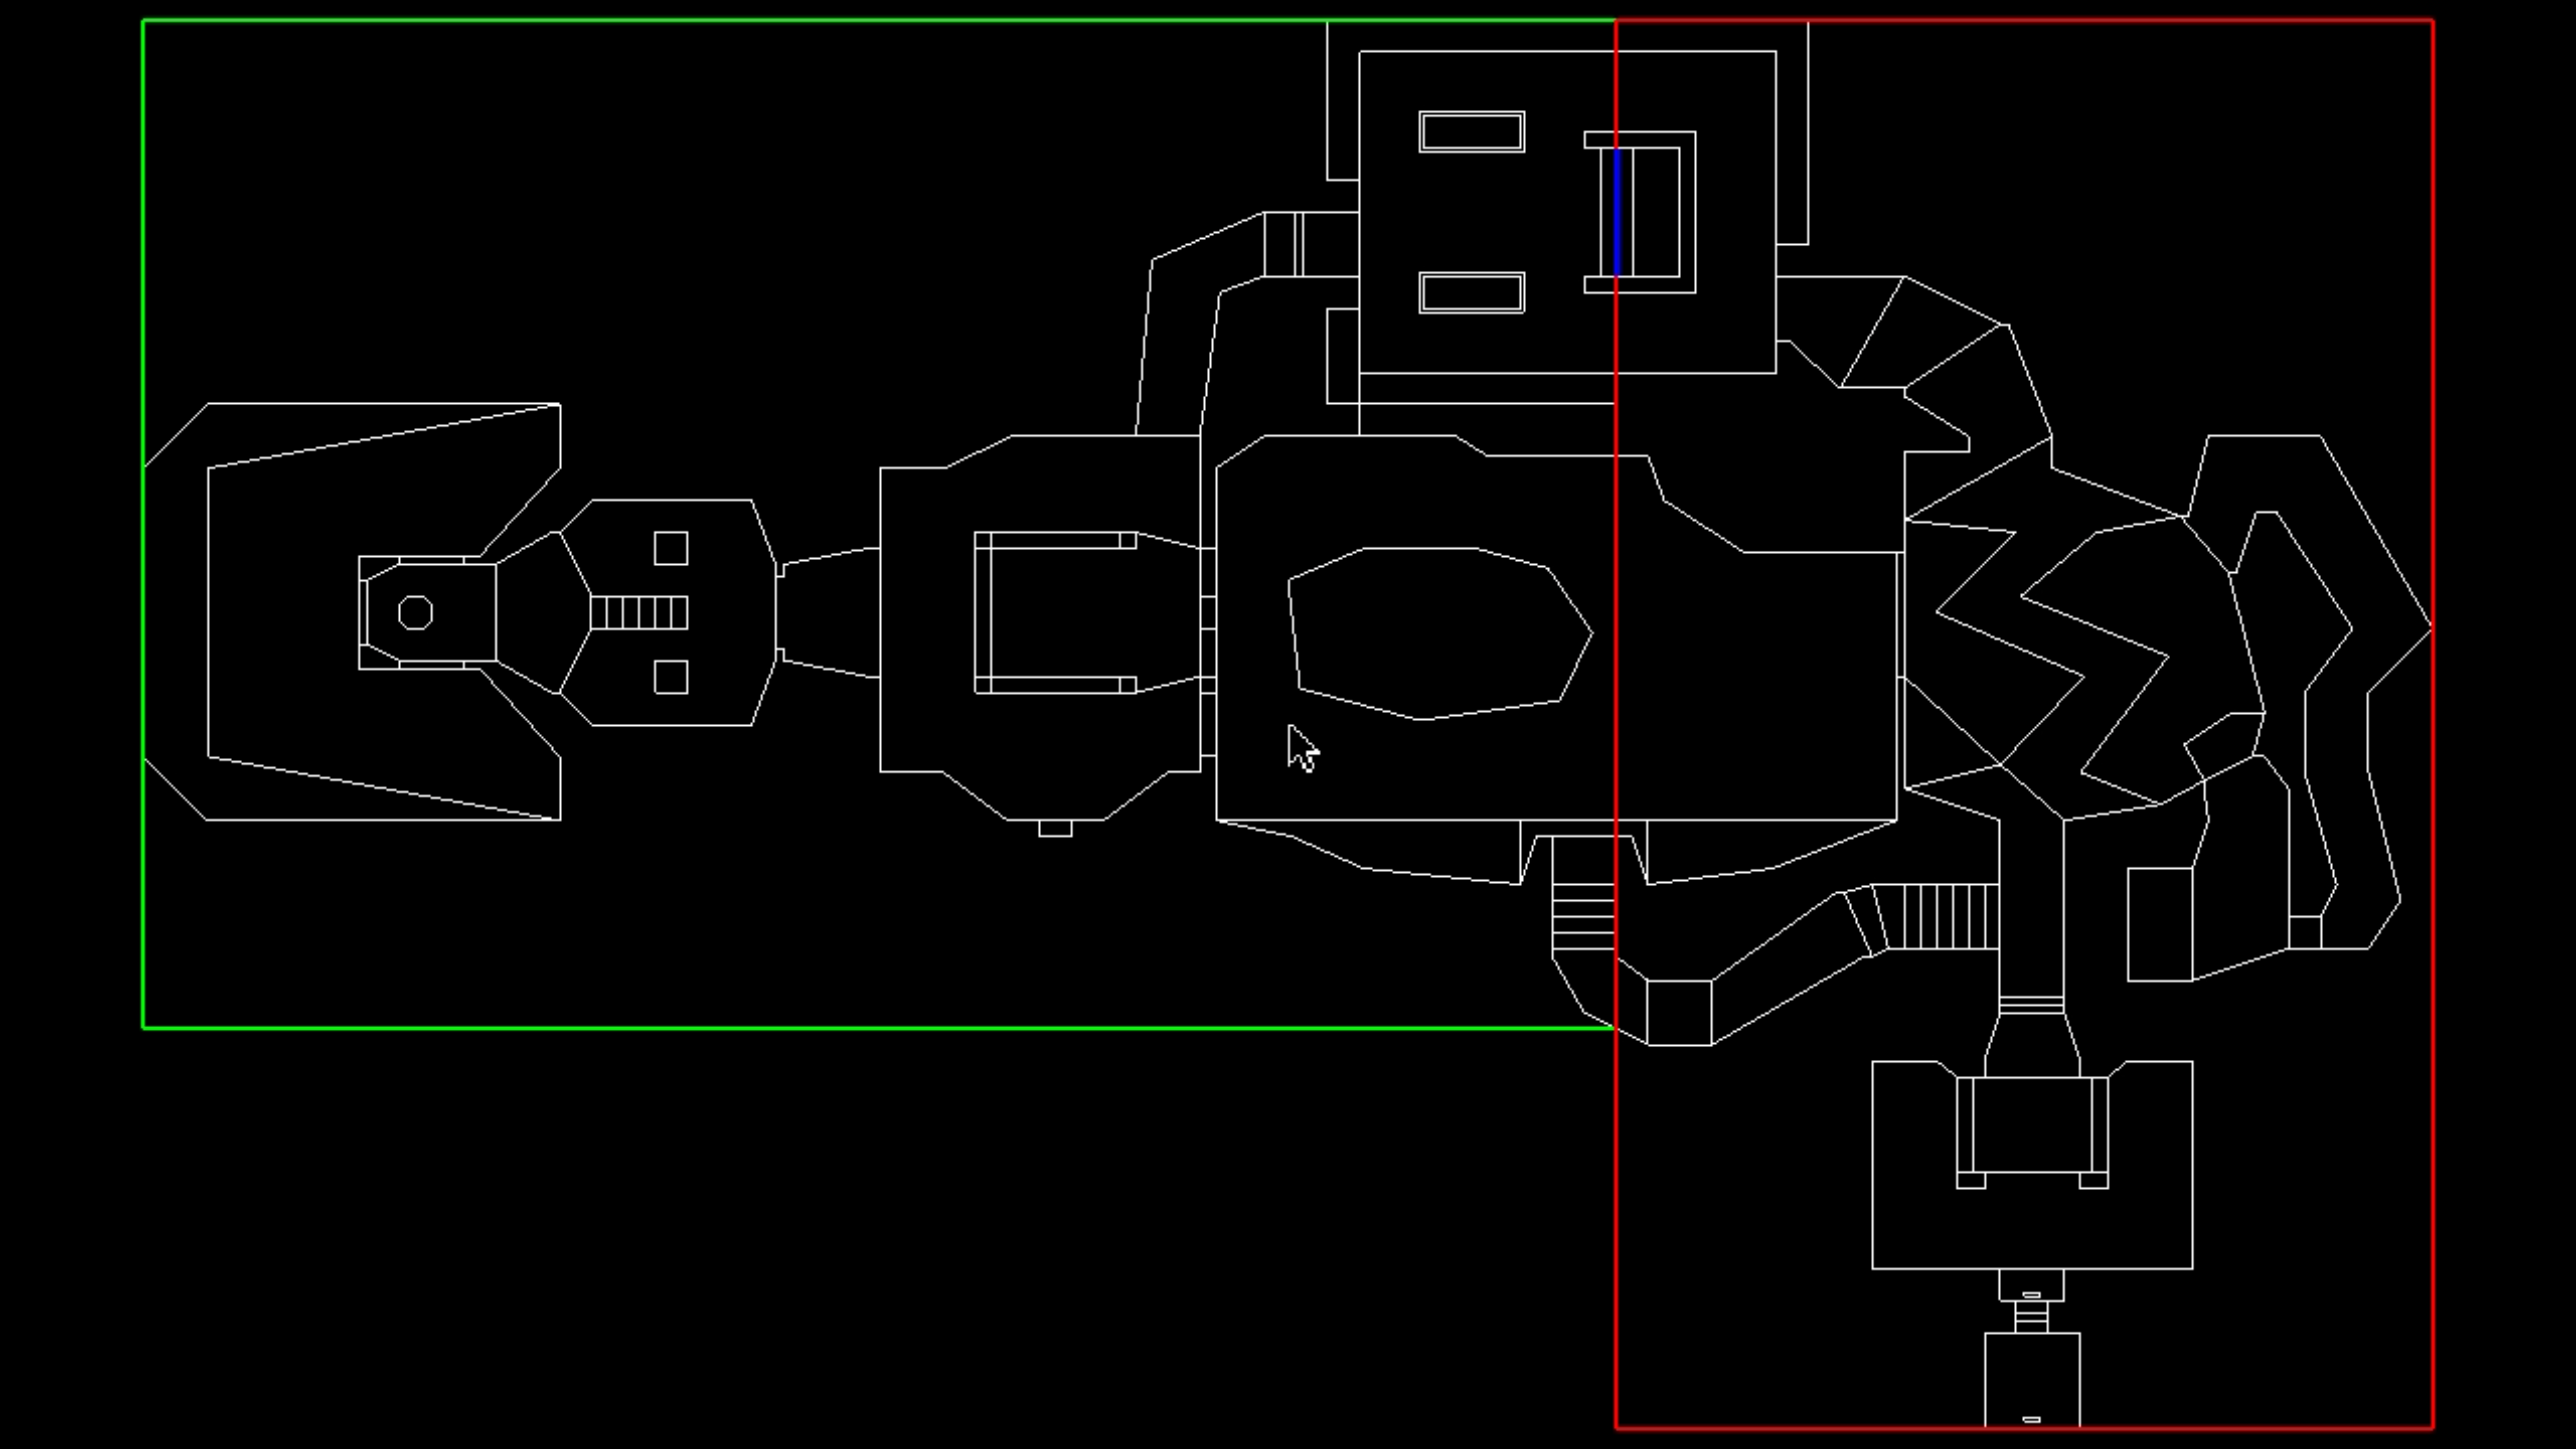 This image shows the Splitter Line for the BSP Tree
This image shows all of the convex subsectors (SSECTORS) of the BSP Tree
Here we can see how we are able to use the BSP tree traversal to detect exactly what SSECTOR and SECTOR a player is within inside of the game.
When the NODEs of the BSP are traversed the line defs are converted into walls facing the player and rendered from front to back with culling to remove already rendered sections. This image shows that process in action where walls are rendered from closest to furthest, culling any walls that are not facing us via traversal of the BSP tree.
 credit to DIY
Once each wall is determined portions of walls are chopped away in a portal processing section to render windows for those side defs with a transparent section. The remaining walls are rendered line by line to the screen.
This is the Raycasting method of rendering that was common in many games of that era. See Lode's Computer Graphics Tutorial on Raycasting for better details.
At this junction we have completed the core of understanding and loading WAD data in a DOOM game, lets move on to creating a DOOM engine level of our own.